
How To: Convert a TS4 Fireplace to TS2
by platasp!
This tutorial is for anyone that would like to convert a 4t2 fireplace.
Knowledge Level: beginner+
This tutorial may assume you have basic knowledge of blender and SimPE (I will do my best to be thorough 🤗)
You can click on the images to make them larger if needed!
Thank you to Numenor, Episims, and LordCrumps for their assistance with building an efficient and effective fireplace template
Programs Needed:
A fireplace you’d like to convert 😊
Sims 4 Studio (S4S)
Blender 2.79b or above (I’ll be using Blender 2.79b)
SimPE 75.69 or above
LC_Sims4ShadowFile
Scriptorium
Notepad
Step 1: Extract TS4 mesh and Textures
-
Open S4S
-
Click on My Projects and navigate to your TS4 .package file
-
Extract the Mesh and Textures to a convenient location.
-
Be sure to also extract the “material_lighttex” texture too!
Step 2: Preparing Mesh for TS2 via Blender
-
Open the mesh in Blender
-
From Object Mode, if fireplaces should be against wall, move the location of the mesh(es) by Y= 0.09 for each “s4studio_mesh_#” listed
-
(Press “N” to open Transform Menu)
-
-
This makes the mesh flush with the wall
-
You can hide/unhide meshes via the “Eye” next to the name
.png)
-
Separate the shadows (if combined)
-
Click on the shadow studio mesh, press tab (you should now be in Edit Mode)
-
Press “C” to “paint” the vertices you want selected (in this case the groundshadow) by holding down your LMB. Don’t worry about getting all of them
-
Press the RMB to cancel the interaction then press “L” to select the remainder of the groundshadow vertices
-
Press “P” to open the Separate Menu and select the first option – “Selection”
-
.png)
.png)
-
Separate the logs from the fireplace
-
Click on the shadow studio mesh, press tab (you should now be in Edit Mode)
-
Press “A” to Select All vertices
-
From the UV editor, scoll the bottom menu and enable the “Keep UV and Edit Mode in Sync” button
-
Next to it, select the option to switch to Face Select
-
Open a texture you exported in Step 1
-
If all vertices are still selected, press “A” again
-
Press “C” to “paint” the vertices you want selected (in this case the logs) by holding down your LMB.
-
Press the RMB to cancel the interaction
-
From the 3D View, press “P” to open the Separate Menu and select the first option – “Selection”
-
.png)
.png)
-
For ease, rename the “s4studio_mesh_#” components. For mine:
-
Fireplace
-
Logs
-
Groundshadow
-
Southwallshadow
-
-
Identify if you want separate subsets (glass, tile, mantle, etc) and separate them the same way as you would logs/shadows
-
Be sure to smooth any seams you may have!
Slots:
-
In Edit Mode, select a vertex at the level you want your slots (for deco)
-
Switch from Face Select to Vertex Select
-
Right Click on a Vertex at the height you want for slots
-
From the Transform menu (press “N”), copy the Location # of Z coordinate to Notepad
-
Export your meshes as .OBJ files
-
Select 1 mesh at a time
-
Export > Wavefront (.OBJ)
-
From the Export OBJ menu be sure to check Selection Only + Smooth Groups
-
Rename your save as [name of mesh].obj
.png)
.png)
Step 3: Cloning the Fireplace Template
-
Open SimPE (I’ll be using v77.69)
-
Open Object Workshop
-
Press “Open” and select your preferred template (in this example I’ll be using a Maxis Chimney 2 tile)
-
From the Task dropdown menu, select Clone
-
Enable all but “Create Standalone Object”, “Pull Animations”, and “Reference original Mesh”
-
-
Update the Catalogue description based on the TS4 name/description or make one up!
-
Please leave the note from Numenor
-
-
Press Finish
-
.png)
-
Update the Scenegraph ModelName
-
Keep it simple and unique
-
not use special characters or capital letters
-
Save file to your Sims 2 Downloads folder
-
Documents > EA Games > [Game Version] > Downloads
-
-
.png)
-
Update the Object Data (OBJD)
-
Rename the [Custom Name] portion for each
-
Be sure to “Commit” before moving to the next OBJD
-
Do not delete anything outside of [Custom Name]
-
Copy main OBJD name to Notepad
-
-
Open Tools > Object Tools > Hash Generator
-
Copy the Hash Value and paste into the GUID
-
Update the string for each OBJD to create a unique hash value
-
For the main OBJD, select the box next to “update all MMATs” and then press “Update”
-
-
Be sure to “Commit” before moving to the next OBJD
-
-
-
.png)
-
Update the Texture Image (TXTR)
-
Modelname-logson – import the “material_lighttex”
-
Modelname-base – import fireplace texture
-
Right click on the image
-
Depending on how you saved, import your image
-
DDS: Import DDS
-
PNG: Build DXT
-
If you don’t have this option, you need this plugin
-
-
-
Commit changes before selecting the next texture
-
-
-
If you have additional textures (ie glass):
-
Right click on an existing image and select Clone
-
-
.png)
-
Update the Shape (SHPE)
-
Confirm “fireplace”, “logs”, and “groundshadow” are present
-
Add “southwallshadow”
-
Select “groundshadow” and press add
-
Subset Name: southwallshadow
-
Both groundshadow and southwallshadow are repositoried to the LCShadowFile so no further updates are needed
-
-
Add any additional subsets
-
Select any other subset and press add
-
Add the preferred name of your subset (ex: glass, tile, mantle, etc)
-
Add the Material Definition name formatted as:
-
##0x1C050000!cresname_subsetname_texturename
-
ie: ##0x1C050000!pacastironfireplace_glass_base
-
-
Copy this name to Notepad
-
-
Commit changes
-
-
.png)
-
Update the Resource Node (CRES)
-
From the Blocklist dropdown, select the slot_mantle_dec_X
-
Update the Translation Z coordinate to what is in Notepad
-
(From Step 2: Slots)
-
-
-
Commit
-
.png)
Step 4 (Optional): Adding Subsets
Update the Material Definition (TXMT)
-
-
If you added additional subsets/textures:
-
Right click on an existing TXMT and select Clone
-
Rename the Filename to match the Material Definition within SHPE without ##0x1C050000! (keep the _txmt suffix)
-
Click on the cMaterialDefinition and rename the Description to match the Material Definition within SHPE without ##0x1C050000!
-
Fix TGI + Commit
-
-
.png)
.png)
-
Update Geometric Node (GMND)
-
If you’ve added a recolorable subset:
-
Within GMND Blocklist, select tsDesignModeEnabled
-
Ensure “Array” is selected, then press Add
-
Select new Array line and change Name to subset name
-
Commit
-
-
.png)
-
Add Material Override (MMAT)
-
If you’ve added a recolorable subset:
-
Clone the existing MMAT
-
Change name (dtString) to the SHPE of the new Material Definition
-
Change subsetName (dtString) to the SHPE of the new Subset Name
-
Commit
-
-
.png)
Step 5: Update GMDC
-
Import the “fireplace” mesh
-
Change Action dropdown to “Replace” and select “fireplace”
-
Press Ok on the error
-
-
Import the “logs” same as “fireplace”
-
Import the “groundshadow”
-
Update Opacity to “Shadow”
-
Deselect “use in bounding Mesh”
-
Change Action dropdown to “Replace” and select “groundshadow”
-
Press Ok on the error
-
-
Import the “southwallshadow”
-
Update Opacity to “Shadow”
-
Deselect “use in bounding Mesh”
-
Change Action dropdown to “Rename” and type “southwallshadow”
-
Press Ok on the error
-
-
If you have any additional subsets, import them
-
Change Action dropdown to “Rename” and type the name of the subset
-
Press Ok on the error
-
.png)
.png)
-
From the Model tab, click the “Clear” next to Bounding Mesh Control
-
From the Groups tab, select “fireplace” then “Add to Bounding Mesh”
-
Apply this as well to “logs” and any additional subsets
-
It’s not necessary to do this for shadow meshes
-
-
-
Preview your new mesh
-
Click on cGeometryDataContainer
-
Press Preview
-
-
.png)
.png)
Step 6: Updating Script File
-
Update the Text Lists (STR#)
-
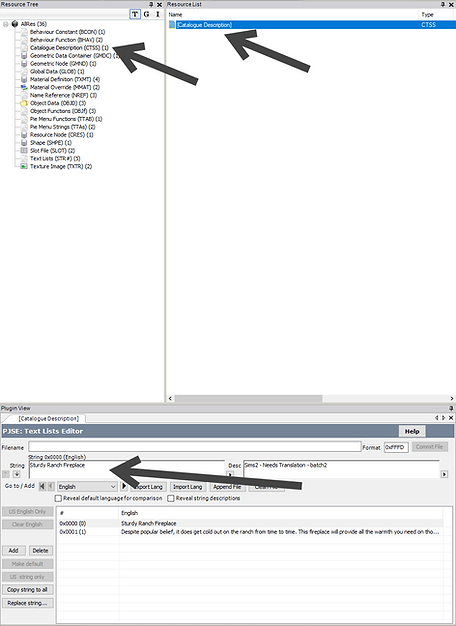
Click on Catalogue Description (CTSS)
-
Copy line 0 into Notepad
-
Copy line 1 into Notepad
-
-
Click on Text Lists (STR#) > Fireplace – Info
-
Paste line 0 you copied into Notepad into line 1
-
Paste line 1 you copied into Notepad into line 2
-
-
Click on the Converter tab
-
Pick a number between 5-65535 (avoiding 1-4, 9, 75, 99)
-
This number will be unique to your fireplace – copy into Notepad
-
Enter the number into the Decimal line
-
Copy the Hex Value (the last 8 alphanumeric)
-
-
-
Click on the Resource tab
-
Copy the Hex Value into Instance
-
-
.png)
.png)
.png)
Updating the Script .txt Document
-
Copy the .txt template into Scriptorium_Fireplaces
-
Replace NN in the filename with your unique Hex Value you pasted into Notepad
-
Replace [Custom Name] with your filename
-
Open the .txt document
-
Replace NN with your unique Hex Value you pasted into Notepad
-
In line 2, replace PackageFilename with your filename
-
Replace 255 with your unique Hex Value you pasted into Notepad
-
Within the quotes, rename to your OBJD main file
-
-
Save File
.png)